Linux on Sony Vaio - Network Install
Configure the Vaio for Network booting
To do this:
- Hit F2 during boot (when the Sony logo is displayed) to get into the BIOS configuration.
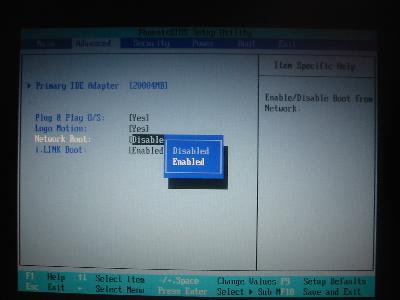
- In the “Advanced” page, set “Network Boot” to “Enabled”.
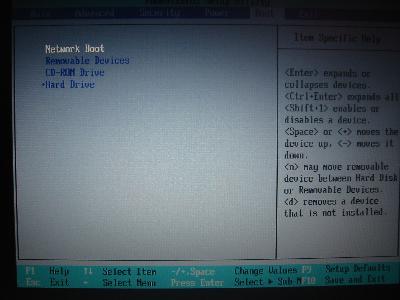
- In the “Boot” page, move “Network Boot” to the top of the list. Alternatively, hit F12 to trigger network booting when the “Sony” screen is displayed at startup.
Configure DHCP
I’ve already got DHCP working on my network, so all I had to do was add the host joplin block to my /etc/dhcpd.conf file:
subnet 192.168.10.0 netmask 255.255.255.0 {
    range 192.168.10.100 192.168.10.200;
    option broadcast-address 192.168.10.255;
    option routers 192.168.10.1;
    option domain-name-servers 192.168.10.1;
    option domain-name "home.differentpla.net";
    option subnet-mask 255.255.255.0;
    allow bootp;

    host joplin {
        hardware ethernet 01:23:45:67:89:ab;
        fixed-address joplin.home.differentpla.net;
        server-name "192.168.10.2";
        next-server 192.168.10.2;
        filename "/tftpboot/pxelinux.0";
    }
}
You’ll probably need the allow bootp; statement as well. I already had that configured.
I have two servers – one (my firewall on 192.168.10.1) hands out the DHCP information; the other (my fileserver on 192.168.10.2) will hand out the boot files.
Configure TFTP
You’ll need to install a suitable TFTP daemon. apt-get tftpd-hpa is good for this. It works well with PXE. It’s configured to run from /etc/inetd.conf.
You’ll also need to install Syslinux to get the default boot images. apt-get syslinux will work for this. After you’ve done this, you’ll need to copy the /usr/lib/syslinux/pxelinux.0 file to /tftpboot.
If you want to use a 2.2 kernel, grab:
If you want to use a 2.4 kernel (I didn’t), you’ll need to grab:
and put them in /tftpboot. The problem with using a 2.4 kernel is that (by default) it doesn’t support the eepro100 network card in the Vaio. You’ll have to work out some kind of solution to this yourself.
Next, create the /tftpboot/pxelinux.cfg/ directory, and put the following into a file /tftpboot/pxelinux.cfg/default:
DEFAULT

LABEL linux
KERNEL tftpboot.img
APPEND initrd=root.bin root=/dev/ram
Configuring NFS
You’ll need an NFS server as well. I’ve already got one correctly configured, so I’m not going to explain it here.
Reboot your Vaio
Now, when you power on your Sony Vaio, you should see it grab an IP address and boot from the image files stored on your server.
Installing Debian
- Select a language. I chose English (U.K.).
- Configure the keyboard. I chose querty/us.
- Partition your hard disk. When I installed Windows XP Pro, I left about 7Gb unpartitioned. I’m allocating my root partition and swap out of that.
- Initialise and activate a swap partition.
- Initialise a Linux partition. Because the images you downloaded are for a 2.2 kernel, this will be an ext2, rather than ext3 partition. We’ll convert it later.
- Next, the installer will ask you to “Install Kernel and Driver Modules”. Select “network” as the method. It’ll think that you’ve not configured your network, so you’ll have to do that. I set the host name to “joplin”. For some reason, once you’ve booted using TFTP, configuring the network interface using DHCP doesn’t work. I had to configure the interface manually. It asks for an IP address, a netmask, a gateway and a DNS server.
- Once you’ve entered all of this information, it’ll download the kernel and drivers from the specified HTTP server.
- Then it’ll suggest configuring Device Driver modules. This won’t work – for some reason it’s looking in
/target/lib/modules/2.2.20-idepci, but the modules are in/target/lib/modules/2.2.20.. You can fix this with a quick symlink, but it’s probably not necessary, unless you’ve got particular drivers that you want to load at this point. If you do try to load any modules, you’ll probably get a load ofdepmod: *** Unresolved symbolswarnings. I did. - Configure PCMCIA support. I’ve no idea what PCMCIA chipset the SRX87 uses, so I ignored it. Looking in
/proc/pcidoesn’t give us any clues, so I guess it’s not supported by the 2.2 kernel. - Skip directly to “Install the Base System”. Select “network” again. It’ll grab the files from the specified HTTP server. This’ll take a short while. Make a cup of tea.
- When it’s finished that, it’ll suggest the “Make System Bootable” option. Choose it. I chose to install LILO in the MBR. Because I’ve got Windows XP installed, LILO suggested putting it in the menu. I chose “Include”, which does this.
- There’s no point in making a boot floppy, because I’ve not got a floppy disk drive, so I just chose “Reboot the System”.
Rebooting
- Go back into the BIOS and turn off Network booting. I did this on both pages in the BIOS.
- Check that Windows XP still boots. It does, so shut it down again.
- Back at LILO, boot Linux. It’ll (eventually) run the Debian System Configuration program.
- Because I’ve got Windows installed, I answered “No” when asked whether the hardware clock was set to GMT.
- It’ll then ask you to: select a timezone; configure MD5 and shadow passwords; enter a root password; set up a user account. Do these.
- It then asks to remove the pcmcia packages. I chose “No”. The last time that I tried this, I said “Yes”, and while removing the packages, the kernel panicked. I’m not doing that again.
- It then asks about using PPP to install the system. Say “No”.
- Then it wants to configure your
/etc/apt/sources.listfile. Unfortunately, your network card won’t be configured correctly, so you’ll have to do that. - Switch to another console (press Alt+F2) and log in as root.
- You’ll need to install the network driver.
modprobe eepro100. - You’ll need to configure the interface. I used
ifconfig eth0 192.168.10.12 netmask 255.255.255.0. - Check that the network is configured correctly.
ping 192.168.10.1. - Configure your routing.
route add default gw 192.168.10.1. - See if your routing is configured correctly.
ping 192.25.206.10. - Check that your DNS is working.
ping www.debian.org. Your/etc/resolv,conffile should have been filled in automatically by now, and this should just work. - Having done all this, you can go back to the installer (press Alt+F1) and finish configuring
/etc/apt/sources.list. Select http as the method, and choose your nearest/quickest mirror. - It’ll download the package lists and then ask if you want to run
tasksel. Your choice – I randselectinstead. I installed the default recommended packages. I’ll go back and prune these later. This takes a while. Make another cup of tea. - It then walks you through the configuration of various things.
Logging In
After doing all that, you should be left at a login prompt on tty1. Enjoy.
Reboot
Reboot to check that it all comes back up. exec shutdown -r now
Configuring the network modules
During the previous reboot, you’ll notice that it failed to configure the network. This is because it doesn’t know which driver to load. Also, it’s still configured for manual configuration. We should fix this now.
Log in as root again, and add the following line to /etc/modutils/aliases:
alias eth0 eepro100
Run update-modules to rebuild /etc/modules.conf.
To configure for DHCP, edit /etc/network/interfaces and replace the eth0 block with the following:
auto eth0
iface eth0 inet dhcp
You’ll then need to ifdown eth0 ; ifup eth0. This step should automatically install the correct network module and use
DHCP to configure the network interface. Run ifconfig to confirm that the network interface was configured correctly.